A flush mount LED wall sits the display face level with the finished wall surface, using a shallow mounting frame so the screen reads as part of the architecture rather than an attachment. Recessed mounting sets the display back into a formed opening where the architectural surround controls the visual edge, sightlines and access strategy. The mounting method shapes everything from structural loading to pixel pitch selection. The right choice depends on service access, wall depth and who owns the surrounding finishes.
This guide covers both approaches with practical specification notes drawn from our installation work across commercial, retail and hospitality projects.
Key Takeaways
- Flush mounting sits the LED modules level with the finished wall surface; recessed mounting sets the display behind the wall plane inside a structural cavity.
- Flush mounting is often faster to install and retrofit but requires careful trim detailing to avoid shadow gaps or proud edges.
- Recessed mounting gives a cleaner architectural reveal but needs earlier decisions on void depth, ventilation, access panels and tolerances — involve the LED contractor before the joinery, drylining or stone package is frozen.
- Front-service LED cabinets make both approaches more practical, but they do not remove the need for safe working space, cable routes and heat planning.
- Architectural fixed installs require fixed-install cabinet formats with front-service access. Rental-grade hardware lacks the alignment tolerance and depth profile these applications demand.
- Both methods need coordinated structural support. Fine-pitch LED cabinets can weigh 25–40 kg/m² before the mounting framework.
- A deliberate shadow gap of 8–10 mm at the display edge is more buildable than a theoretical zero-gap detail, because real walls are never perfectly straight and multiple trades finish into the same junction.
At-a-Glance: Flush vs Recessed Mounting
| Factor | Flush Mount | Recessed Mount |
|---|---|---|
| Wall cavity required | Minimal (50–100 mm for frame and air gap) | 400–600 mm minimum |
| Finished appearance | Display face close to wall plane, frameless look achievable | Display set inside an architectural opening |
| Typical build-out | Stud wall, direct-fix bracket or shallow frame | Structural niche or purpose-built recess |
| Servicing access | Front-access modules recommended | Front or rear access, depending on void depth |
| Retrofit suitability | Good — works with existing walls | Limited — needs structural modification |
| Tolerance sensitivity | Medium | High — small errors at the reveal are more visible |
| Coordination risk | Moderate | Higher |
| Trim/edge options | Shadow gap, reveal trim or plaster bead | Recessed frame with deliberate shadow line |
| Product direction | DFC or DX fixed install | DFC or DX fixed install |
Not sure which approach suits your wall depth? Build a specification to test both.
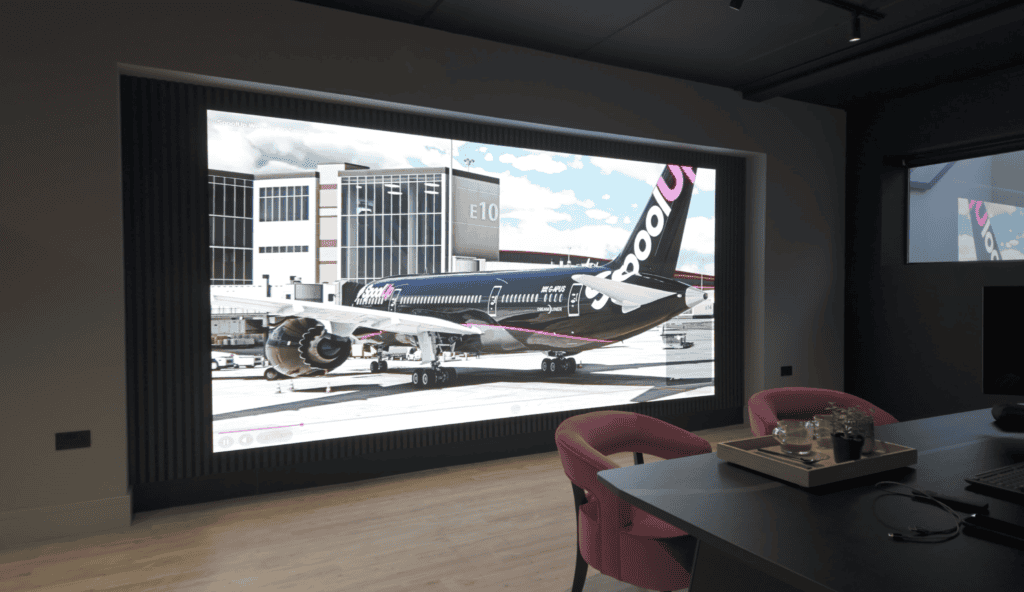
When a Flush Mount LED Wall Is the Right Choice
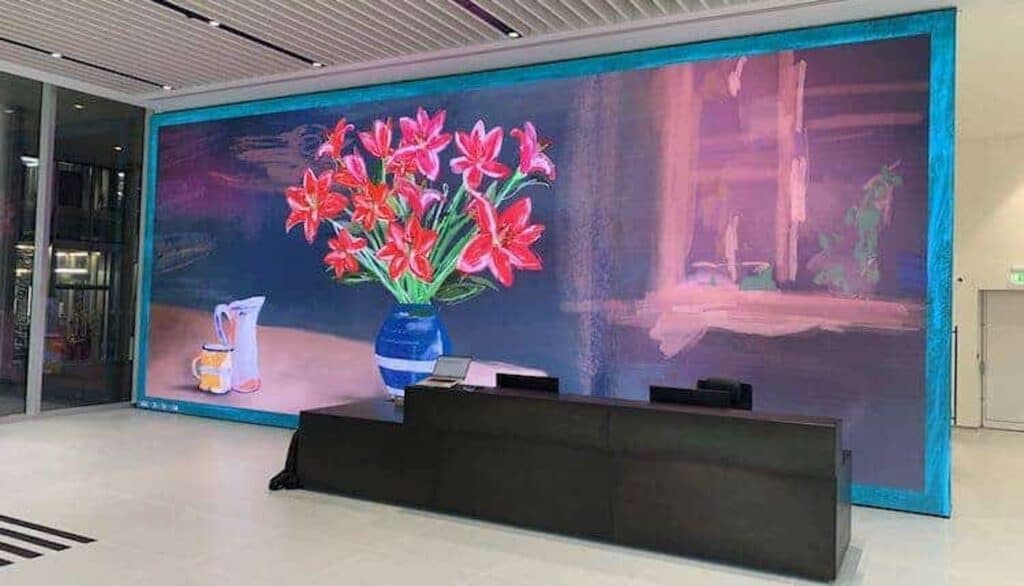
Flush mounting suits projects where the screen needs to feel integrated but the building fabric cannot accept a deep recess. That might be a reception wall with a blockwork or concrete substrate, a retail environment with changing brand zones, or a boardroom where the display replaces a projection surface.
The modules sit on a mounting frame fixed to the wall structure, typically a steel sub-frame behind plasterboard, blockwork or a dedicated stud partition. The critical detail is the transition between the display edge and the adjacent wall material. Architects usually specify a recessed shadow gap (3–5 mm reveal), a powder-coated aluminium trim, or a plaster bead that allows the skim coat to run right up to the display edge. Flush mounting with frameless LED cabinets can deliver a near-seamless display surface when the trim detail is right.
For fixed installations in corporate lobbies, boardrooms and retail environments, the DFC Series is designed around front-access servicing. Individual modules lift out from the front, so there is no need to build in rear access panels or leave clear space behind the wall. This matters in retrofit projects where the wall depth is fixed.
The limitation is edge treatment. If the LED cabinets project from the wall, even slightly, the side view matters. In a corridor, showroom or atrium, people approach the screen from an angle. A shallow return or trim detail can solve that, but it should be drawn rather than improvised.
Structural loading is straightforward to calculate but easy to underestimate. A 3 m × 2 m fine-pitch wall can weigh 150–240 kg for the display alone, before the sub-frame. The mounting frame and its fixings must be specified for the finished load, with the structural engineer signing off the wall’s capacity, particularly on stud partitions where additional noggins may be needed at close centres.
When Recessed Mounting Is Worth the Extra Work
Recessing an LED wall into the building fabric makes the display read as part of the wall, not something fixed to it. This approach suits new-build and major refurbishment projects where the wall construction can be designed around the display from the start: hotel lobbies, corporate atria, museums, auditoriums and high-end retail interiors.
The structural niche needs to accommodate the full depth of the LED cabinets plus a rear service zone. The recess also needs to work for power, data, ventilation, access and finished tolerance. If the recess is formed before the LED package is agreed, the project can inherit a problem that is expensive to correct.
The reveal is often where a recessed design succeeds or fails. Too tight, and module removal becomes awkward. Too wide, and the display looks like it has been placed in a hole rather than designed into the wall. We normally prefer a deliberate shadow gap of 8–10 mm over an attempted zero-gap detail, because real buildings move, walls are not perfectly straight, and finished trades need workable tolerances.
Recessed mounting gives the option of rear-access servicing through an access corridor, service hatch or adjacent room. This is standard practice for bespoke display solutions in broadcast studios and command centres where front-of-house disruption during maintenance is unacceptable.
If the flush mount LED wall sits alongside other display surfaces in a wider package, keeping pixel pitch and brightness consistent across mixed formats is worth reviewing early. Our indoor LED screen guide covers how to approach that.
Depth, Tolerance and Access: The Details That Decide the Mounting Type
The biggest mistake is choosing flush or recessed from a front elevation only. A front elevation does not show how the screen is fixed, cooled, powered or serviced.
Depth. Indoor fixed-install LED cabinets vary in depth depending on pitch, cabinet format, PSU arrangement and service method. For early design, allow a sensible zone rather than a single tight number. If the wall build-up only has a shallow cavity, flush mounting is more practical. If the architect wants the display face aligned with stone, timber or metal panelling, the recess depth must be confirmed before those packages are procured.
Tolerance. LED walls are unforgiving because the lit surface makes small level changes visible. Recessed installations add a tolerance stack: structural opening, drylining or joinery, frame adjustment range, cabinet alignment, module face consistency, and the final reveal. That stack needs ownership. If nobody owns it, site teams end up trying to solve a geometric problem with finishing trims.
Access. Front-service LED has changed architectural integration, but it is not a complete shortcut. Technicians still need safe physical access to the screen face, room to remove modules, and a way to isolate and test systems. Working at height should be planned properly, particularly in atria and retail spaces with public access. The UK Health and Safety Executive provides clear guidance on working at height, and those principles apply after handover as much as during installation.
The LED Screen Configurator can help lock down depth, pitch and cabinet format early in the design process.
Heat, Power and Signal Routes
A recessed display traps more heat than an open flush mount. That does not automatically make recessed mounting unsuitable, but it means heat movement needs a path: a ventilated void, grille detail, high-level extraction, or a wider mechanical strategy. For flush-mounted walls, the specification should include at least 50 mm of clear air space behind the cabinets, with ventilation paths at top and bottom.
Power and data also need space. LED walls are modular, and the routing should match the cabinet layout. Short, logical cable paths make installation cleaner and service faster. The electrical package should be coordinated with the project’s competent electrical designer, and the IET’s reference on BS 7671 Requirements for Electrical Installations provides the regulatory context for UK projects.
Processor location is another early decision. Brompton Tessera is a common choice for fine-pitch architectural walls where colour accuracy and low-latency processing matter. Novastar suits projects where the content system already sits in that ecosystem or where budget is a stronger constraint. Either way, do not bury the processor behind the screen unless there is a clear access and cooling plan.
Pixel Pitch and Viewing Distance
The mounting method and pixel pitch selection are linked. Architectural flush mount LED walls are typically viewed at close range, which demands fine pixel pitches to avoid visible pixel structure.
| Closest regular viewing distance | Common pitch direction |
|---|---|
| 1.5 to 2.5 metres | P1.2–P1.8 |
| 2.5 to 4 metres | P1.8–P2.6 |
| 4 to 7 metres | P2.6–P3.9 |
| 7 metres plus | Pitch can open up, depending on content |
These are not fixed rules. A reception screen showing fine text and brand films has different demands from an auditorium backdrop. Content matters: if the screen will show detailed data, product photography, small typography or camera feeds, pitch selection needs more care. Closer viewing also makes alignment and module consistency more visible, so the installation tolerance becomes tighter at finer pitches.
Specification Coordination Before the Wall Is Built
Getting a flush mount LED wall right requires early coordination between the architect, structural engineer, M&E consultant and AV integrator. The following should be resolved by RIBA Stage 3 (Spatial Coordination) at the latest:
- Finished face datum — keeps the LED face aligned with the architectural finish.
- Structural substrate — confirms whether the wall can take load or needs secondary steelwork.
- Cabinet depth and service route — prevents access problems after installation.
- Power and data — dedicated supply circuit, Cat6 or fibre data feeds, and processor location.
- Ventilation route — passive or active cooling strategy, coordinated with the ceiling void or floor plenum.
- Edge detail — material, colour and profile at the display edge, agreed between architect and AV contractor.
- Programme interfaces — prevents late clashes with drylining, joinery, M&E and AV packages.
This coordination is where projects go wrong. An LED wall added at Stage 4 or later often results in compromised mounting, visible service panels, or an inadequate power supply. Our technical team works with design teams from early stages across our LED wall project portfolio to avoid these problems.
From the Field
I always look at the side section before I get too attached to the front elevation. A flush or recessed LED wall can look tidy on a render, but the section tells me whether the screen can be installed, cooled and serviced without turning the wall into a maintenance problem.
On a recent corporate headquarters fit-out, the architect wanted the LED wall to read as a backlit panel within a timber-clad feature wall. We specified a recessed mount with rear access from an adjacent service corridor, and the finished result looked like the screen had always been part of the building. On a retail showroom with existing masonry walls, flush mounting with front-access DFC cabinets was the only practical option. We had the install done in two days.
My advice: set the datum early and give the LED package a controlled tolerance. If the design wants a fine shadow gap, that is fine, but I would rather agree a buildable 8 mm detail than chase a theoretical zero gap across a wall that has three other trades finishing into it.
— Daniel Reynolds, Managing Director, Dynamo LED Displays
Flush Mount LED Wall: Frequently Asked Questions
What is the minimum wall depth needed for a flush mount LED wall?
A flush mount LED wall typically needs 50–100 mm of depth behind the display face for the mounting frame and air gap. Front-access cabinets do not need rear service space, so the total wall build-up can be kept under 200 mm including plasterboard and framing. This makes flush mounting practical for retrofits and stud-wall construction where deep cavities are not available.
Can you recess an LED wall into an existing wall?
It depends on the wall construction. Stud partition walls can be modified to create a recess, provided there is sufficient depth and the structural capacity is confirmed. Solid masonry or concrete walls require cutting a niche, which involves structural assessment and is significantly more disruptive. For existing buildings, flush mounting is usually the faster and more cost-effective option.
Is front-service LED required for recessed installations?
For most recessed architectural installations, front service is the practical choice. Rear service can work if there is a dedicated access void behind the wall, but many interiors do not have that space. Front service still needs safe access from the room side, so maintenance routes and working height should be considered during design.
What pixel pitch should we use for an architectural LED wall?
Most indoor architectural LED walls use pixel pitches between P1.2 and P2.6, with P1.5–P1.8 typical for viewing distances under 3 metres. Larger atrium or auditorium walls may not need such a fine pitch. Content type matters too: detailed data, product photography and small typography push the pitch finer. See the viewing-distance table above for a quick reference.
Does a recessed LED wall need ventilation?
Yes, it needs a way to manage heat. The exact approach depends on the display size, cabinet design, duty cycle and wall construction. Avoid sealing the LED into a tight insulated recess without a planned heat path. Heat management should be coordinated with the architectural and M&E teams, especially in lobbies, retail spaces and rooms with long operating hours.
How heavy is an architectural LED wall?
Fine-pitch panels (P1.2–P2.5) typically weigh 25–40 kg per square metre for the display alone, before the mounting frame. A 4 m × 2.5 m wall could weigh 250–400 kg in total. The structural support must be rated for this load with an appropriate safety margin as specified by the structural engineer.
How early in the design process should we involve the LED contractor?
As early as RIBA Stage 2 or 3. The LED wall affects structural loading, wall depth, power supply, ventilation and the finished edge detail. If the AV package is introduced after the wall construction is frozen, the mounting method, access strategy and tolerance are already compromised. Early involvement prevents expensive late-stage redesign.
Can we mount an LED wall directly to an existing wall without a frame?
Sometimes, but the wall must be surveyed for flatness, strength, fixing suitability and cable routes. Most projects still need a secondary frame to create alignment adjustment and distribute load. Direct fixing without adjustment can make cabinet alignment difficult, especially on older walls or substrates that are not flat across the full display area.
Conclusion
A well-specified flush mount LED wall, whether sitting proud of the finished surface or recessed into the building fabric, should look like it belongs in the architecture rather than something added as an afterthought. The right mounting method comes from the section drawing, not just the front elevation. Wall construction, service access, viewing distance, tolerance and the design intent for the finished space all feed into the decision. Getting these choices made early, with the full design team aligned, is what separates a clean architectural installation from a compromise.
To discuss flush mount LED wall options or recessed mounting for your project, speak to our technical team on +44 (0)203 489 9878 or get in touch via our contact page.